I'm very lucky that I know a lot of people IRL who love to bake and who also love to share recipes. This recipe comes from one of these wonderful friends, M. She posted a picture of these bad boys on FB and they looked so yummy, I had to try them. They were a huge hit in this house and when I plugged the ingredients in to find out the nutrition value, I loved that they were approx 190 calories each!
They were moist and delicious. My hubby has asked that I make them on a weekly basis lol. Again, thanks to M., I made a double batch and there are a bunch in the freezer. You need to make these!!
Chocolate Banana Muffins with Chocolate Chips
source: sallysbakingaddiction.com
Ingredients
3 large very ripe bananas, mashed with no large lumps
2/3 cup sugar
1 large egg
1/3 cup unsweetened apple sauce
1/2 cup whole wheat flour
1/2 cup all purpose flour
1/2 cup cocoa powder, unsweetened
1/2 tsp salt
1 tsp baking soda
1 tsp baking powder
1 cup semi sweet chocolate chips, plus a few more to top your muffins
Preheat your oven to 375F. Line the muffin pan with baking cups.
If you haven't done so already, mash your bananas in a large bowl using a fork. Be sure to mash them well, there shouldn't be any big lumps remaining. Now stir in the sugar, egg and applesauce.
Sift the flour, cocoa powder, salt, baking soda and baking powder into the wet mixture. It's very important to sift it in, this will ensure that there are no cocoa powder lumps. Lightly mix together. Fold in the chocolate chips, do not overmix. But don't worry, the mixture will be a little lumpy/chunky.
Fill the 12 baking cups to the top and bake for 18 to 20 minutes or until a toothpick inserted in the middle of a muffin comes out clean. Let them cool in the muffin pan for about 3 minutes before transferring them to a rack to cool completely.
You can keep your muffins in an airtight container on the counter for up to 5 days (if they last that long) or put them in the freezer. When ready to eat them, I just take how many I need out and let them thaw or I pop them in the microwave for about 8-10 seconds.
Happy Baking!
Showing posts with label chocolate. Show all posts
20 April 2013
7 March 2012
Mini Kiss Pies
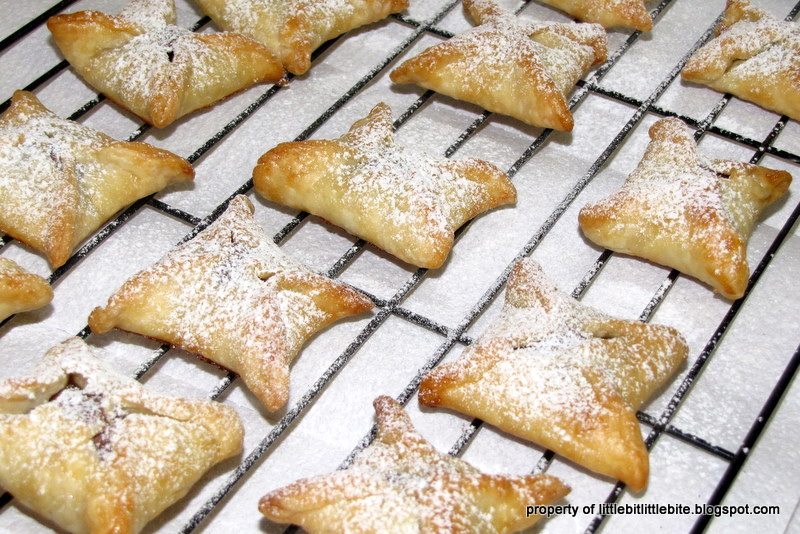
While browsing Pinterest, I came across this cute idea to use up some kiss chocolates that I had leftover from the holidays. You could actually use any kind of kiss chocolate, but we had the plain variety so I went with that. I can only imagine what the caramel ones would be like!! It also calls for pre-made pie dough which speeds the process up quite a bit. If I had pie dough in my freezer, I would have used it, but I didn't. So I picked up the refrigerated box variety and although it wasn't the same as the homemade stuff, it was good! The pies were gobbled up, nothing left!
Mini Kiss Pies
source: www.picky-palate.com
Ingredients
1 pie crust, thawed (a refrigerated package contains 2 crusts, so if you make both double the amounts)
16 - 18 kiss chocolates (your choice of flavor)
1 egg white whisked with 1 tbsp of water
granulated sugar
powdered sugar
Preheat your oven to 350F. Unroll your dough onto a lightly floured surface and roll it if necessary. I used a 3 inch circle cookie cutter to cut my circles., but you could simply use a knife. Fold so opposite sides meet at the tip of the kiss and pinch together. Then fold the other 2 opposite sides and pinch at the tip. Now press the edges together to form a criss-cross. Continue cutting dough and re-rolling until you have used up all your dough.
Brush the mini pies with the egg wash and then sprinkle with some granulated sugar. Place onto a baking sheet with a baking liner or parchment paper. Bake for 20-28 minutes or until golden brown. Remove from the oven and cool for about 5 minutes before transferring to a cooling rack. Dust with some powdered sugar and serve.
Happy baking!
Mini Kiss Pies
source: www.picky-palate.com
Ingredients
1 pie crust, thawed (a refrigerated package contains 2 crusts, so if you make both double the amounts)
16 - 18 kiss chocolates (your choice of flavor)
1 egg white whisked with 1 tbsp of water
granulated sugar
powdered sugar
Preheat your oven to 350F. Unroll your dough onto a lightly floured surface and roll it if necessary. I used a 3 inch circle cookie cutter to cut my circles., but you could simply use a knife. Fold so opposite sides meet at the tip of the kiss and pinch together. Then fold the other 2 opposite sides and pinch at the tip. Now press the edges together to form a criss-cross. Continue cutting dough and re-rolling until you have used up all your dough.
Brush the mini pies with the egg wash and then sprinkle with some granulated sugar. Place onto a baking sheet with a baking liner or parchment paper. Bake for 20-28 minutes or until golden brown. Remove from the oven and cool for about 5 minutes before transferring to a cooling rack. Dust with some powdered sugar and serve.
Happy baking!
9 February 2012
Chocolate Chip Cookie Dough Cheesecake bars
I love anything chocolate chip. When I found this recipe on Pinterest (I can send you an invite if you're interested in joining), I had to make them ASAP.
Now, I love all desserts but when there are chocolate chips added, it just seems to make the dessert that much better LOL. After making this dessert and sharing it with my family, I realized that I have officially passed on my love of chocolate chip anything to my DD. She's only 3 and already knows how these little bits can make any dessert wonderful. She told me after having her piece that she LOVES chocolate chips. I told her, "so does Mommy" hehe.
These will not disappoint. They were fantastic and a definite share.
And they taste as amazing as they look.
Chocolate Chip Cookie Dough Cheesecake bars
source: Brandy's Baking
Ingredients
Crust:
1 1/2 cups graham cracker crumbs
5 tbsp unsalted butter, melted
Chocolate chip cookie dough:
5 tbsp unsalted butter, room temperature
1/3 cup packed light brown sugar
3 tbsp granulated sugar
1/4 tsp salt
1 tsp vanilla extract (I use pure over artificial)
3/4 cup all purpose flour
2/3 cup chocolate chips (I used mini chocolate chips)
Cheesecake filling:
10 oz cream cheese, room temperature
1/4 cup sugar
1 egg, room temperature
1 tsp vanilla extract
Preheat the oven to 325F. Line an 8 inch square baking pan with parchment paper or foil allowing a little overhang and spray with a non-stick cooking spray. Set aside.
Mix the melted butter and graham cracker crumbs until thoroughly combined. Press mixture into the prepared pan. Bake in the preheated oven for 6 minutes. Remove pan to a cooling rack. Leave your oven on.
While the crust is cooling, prepare the cookie dough. For the next step you can either use a stand mixer or an electric mixer. If using a stand mixer, please use the bowl that comes with it along with the paddle attachment. In a bowl, beat butter, brown sugar, granulated sugar, salt and vanilla until smooth and thoroughly combined, about 1 minute. Mix in the flour on low speed and mix until just incorporated. Mix in the chocolate chips. Set aside.
In the bowl of a stand mixer fitted with the paddle attachment or in a large bowl with an electric mixer, cream together the cream cheese and sugar until smooth. Mix in the egg and vanilla on low speed just until incorporated. Pour the cheesecake batter onto the prepared crust. Using your hand to form teaspoon-sized clumps, distribute the cookie dough on top of the cheesecake batter. Be sure to use all of the dough.
Bake for about 30 minutes, until the top (cookie dough) feels fry and firm and the entire pan looks set if given a gentle shake. Move bars to a cooling rack and allow to cool completely. Chill in the refrigerator overnight or for at least a couple of hours.
Lift the bars out by the overhang and cut into squares for serving.
Happy baking!
Now, I love all desserts but when there are chocolate chips added, it just seems to make the dessert that much better LOL. After making this dessert and sharing it with my family, I realized that I have officially passed on my love of chocolate chip anything to my DD. She's only 3 and already knows how these little bits can make any dessert wonderful. She told me after having her piece that she LOVES chocolate chips. I told her, "so does Mommy" hehe.
These will not disappoint. They were fantastic and a definite share.
And they taste as amazing as they look.
Chocolate Chip Cookie Dough Cheesecake bars
source: Brandy's Baking
Ingredients
Crust:
1 1/2 cups graham cracker crumbs
5 tbsp unsalted butter, melted
Chocolate chip cookie dough:
5 tbsp unsalted butter, room temperature
1/3 cup packed light brown sugar
3 tbsp granulated sugar
1/4 tsp salt
1 tsp vanilla extract (I use pure over artificial)
3/4 cup all purpose flour
2/3 cup chocolate chips (I used mini chocolate chips)
Cheesecake filling:
10 oz cream cheese, room temperature
1/4 cup sugar
1 egg, room temperature
1 tsp vanilla extract
Preheat the oven to 325F. Line an 8 inch square baking pan with parchment paper or foil allowing a little overhang and spray with a non-stick cooking spray. Set aside.
Mix the melted butter and graham cracker crumbs until thoroughly combined. Press mixture into the prepared pan. Bake in the preheated oven for 6 minutes. Remove pan to a cooling rack. Leave your oven on.
While the crust is cooling, prepare the cookie dough. For the next step you can either use a stand mixer or an electric mixer. If using a stand mixer, please use the bowl that comes with it along with the paddle attachment. In a bowl, beat butter, brown sugar, granulated sugar, salt and vanilla until smooth and thoroughly combined, about 1 minute. Mix in the flour on low speed and mix until just incorporated. Mix in the chocolate chips. Set aside.
In the bowl of a stand mixer fitted with the paddle attachment or in a large bowl with an electric mixer, cream together the cream cheese and sugar until smooth. Mix in the egg and vanilla on low speed just until incorporated. Pour the cheesecake batter onto the prepared crust. Using your hand to form teaspoon-sized clumps, distribute the cookie dough on top of the cheesecake batter. Be sure to use all of the dough.
Bake for about 30 minutes, until the top (cookie dough) feels fry and firm and the entire pan looks set if given a gentle shake. Move bars to a cooling rack and allow to cool completely. Chill in the refrigerator overnight or for at least a couple of hours.
Lift the bars out by the overhang and cut into squares for serving.
Happy baking!
4 February 2012
Oatmeal Chocolate Chip Muffins
Just after Christmas, I purchased The Looneyspoons Collection cookbook. It is a combination of old but updated recipes and some new ones.
I made these mostly for my kids but of course my DH and I eat them as well. The only thing that I changed was instead of regular muffin tins, I used my mini muffin tins. The larger muffins were just too much for my kids. And I also have a great stash in the freezer!!
These muffins taste amazing and are very moist. And you can't go wrong with chocolate chips now can you!
Oatmeal Chocolate Chip Muffins
from the Looneyspoons Collection cookbook
Ingredients
1 1/4 cups quick cooking rolled oats (not instant)
1 cup 1% milk
1/2 cup puréed canned peaches (see * below)
1 egg
1/4 cup butter, melted
1 tsp vanilla
1 1/2 cups Nutri Flour Blend (see ** below)
1/2 cup firmly packed brown sugar
2 tsp baking powder
1 tsp baking soda
1 tsp ground cinnamon
1/2 tsp salt
1/2 cup mini semi-sweet chocolate chips
* Drain the canned peaches well and purée them using a blender, hand blender or food processor.
** Nutri Flour Blend is made by Robin Hood. If you don't have any, you can use a mix of 1 cup of all-purpose flour and 1/2 cup of whole wheat flour.
Preheat oven to 375F. Spray your muffin tins (regular or mini) with some cooking spray and set aside.
Pour the milk over the oats and stir. Let it sit for 20 mins. Once 20 mins have passed, stir in the puréed peaches, egg, butter and vanilla. Set aside.
Combine the flour, brown sugar, baking powder, baking soda, cinnamon and salt in a large bowl. Add oat mixture and stir just until the dry ingredients are moistened. Fold in the chocolate chips. The batter should be thick.
Divide the batter in your 12 muffin cups or your mini muffins. I was able to make 48 mini muffins this last batch.
Bake for 20 minutes (or approx 10 minutes for the mini muffins), or until a wooden pick inserted in the center of the muffin comes out clean. Once cool enough to touch, remove muffins from pan and let cool on wire rack.
If you are lucky enough to have some leftover after the first wave of trying them (over and over again), I suggest freezing some. Just pop 'em in the microwave for a quick warm and they taste like they are fresh out of the oven all over again!
I can't tell you enough how much I love the Looneyspoons books. A definite purchase!! Healthy recipes full of taste makes a great cookbook.
Happy baking!
I made these mostly for my kids but of course my DH and I eat them as well. The only thing that I changed was instead of regular muffin tins, I used my mini muffin tins. The larger muffins were just too much for my kids. And I also have a great stash in the freezer!!
These muffins taste amazing and are very moist. And you can't go wrong with chocolate chips now can you!
Oatmeal Chocolate Chip Muffins
from the Looneyspoons Collection cookbook
Ingredients
1 1/4 cups quick cooking rolled oats (not instant)
1 cup 1% milk
1/2 cup puréed canned peaches (see * below)
1 egg
1/4 cup butter, melted
1 tsp vanilla
1 1/2 cups Nutri Flour Blend (see ** below)
1/2 cup firmly packed brown sugar
2 tsp baking powder
1 tsp baking soda
1 tsp ground cinnamon
1/2 tsp salt
1/2 cup mini semi-sweet chocolate chips
* Drain the canned peaches well and purée them using a blender, hand blender or food processor.
** Nutri Flour Blend is made by Robin Hood. If you don't have any, you can use a mix of 1 cup of all-purpose flour and 1/2 cup of whole wheat flour.
Preheat oven to 375F. Spray your muffin tins (regular or mini) with some cooking spray and set aside.
Pour the milk over the oats and stir. Let it sit for 20 mins. Once 20 mins have passed, stir in the puréed peaches, egg, butter and vanilla. Set aside.
Combine the flour, brown sugar, baking powder, baking soda, cinnamon and salt in a large bowl. Add oat mixture and stir just until the dry ingredients are moistened. Fold in the chocolate chips. The batter should be thick.
Divide the batter in your 12 muffin cups or your mini muffins. I was able to make 48 mini muffins this last batch.
Bake for 20 minutes (or approx 10 minutes for the mini muffins), or until a wooden pick inserted in the center of the muffin comes out clean. Once cool enough to touch, remove muffins from pan and let cool on wire rack.
If you are lucky enough to have some leftover after the first wave of trying them (over and over again), I suggest freezing some. Just pop 'em in the microwave for a quick warm and they taste like they are fresh out of the oven all over again!
I can't tell you enough how much I love the Looneyspoons books. A definite purchase!! Healthy recipes full of taste makes a great cookbook.
Happy baking!
26 December 2011
I'm a baking addict at the moment
Scones are what I'm addicted to making at the moment.
I loved them when I made them in cooking school but then it seems that I forgot about them. How I forgot about these light and flaky delights I'll never understand. But I have found them again thanks to a few internet sites that I browse often. They are so quick and easy to put together, that they are perfect for a busy mom, heck a busy anybody! They take minutes to mix up and 15-20min in the oven and they are done! Great as part of your breakfast or a snack at any time of the day. Can you tell that I love them? The first recipe that had me lovin' these again was Strawberry Chocolate Chip Scones from onceamonthmom.com. Truly a wonderful site where I have never been steered wrong on a recipe. Every one of their recipes turns out great and tastes even better!! I made these when strawberries were in season or when they are on sale. But then I needed a replacement for when I didn't have strawberries. Lo and behold, while searching tastykitchen.com, I found a recipe for Banana Chocolate Chip Scones. At this point, I must share with you that I love {LOVE} anything with chocolate chips. I think it's one of those things that always brings me back to being a little girl and baking with my mom. So when I see a recipe with chocolate chips, I usually have to try it. And these scones were definitely no exception. The scones are a hit with anyone who tries them! So jump right in and give 'em a try!
Banana Chocolate Chip Scones
by thesimplenest via tastykitchen.com
Ingredients
2 cups flour
2 teaspoons baking powder
3 tablespoons brown sugar
1/2 teaspoon salt
6 tablespoons cold butter
1 teaspoon vanilla
9 tablespoons milk
1/2 cup mini chocolate chips
1 whole banana, not too ripe
Preparation
Preheat your oven to 400F and line 1 or 2 cookies sheets with parchment paper.
In a large bowl, whisk together your flour, baking powder, brown sugar and salt. Cut the butter into small cubes and then use a pastry cutter to blend into the flour mixture. Using a wooden spoon, stir in the vanilla and milk until the dough begins to come together. Now, stir in the chocolate chips. Cut up your banana into small chunks but be sure you don't mash it because it will add too much moisture to the scones. Mix in the chopped banana until just blended. Form the dough into a rectangle on a clean counter or work surface and then cut into triangles. Try not to overwork the dough as it will become a little tough.
Bake for approx 15-20 minutes or until golden brown.
Let cool and eat! Or you can freeze them once they are completely cool and then pop them in the microwave for a quick warm up before eating.
Happy baking!
I loved them when I made them in cooking school but then it seems that I forgot about them. How I forgot about these light and flaky delights I'll never understand. But I have found them again thanks to a few internet sites that I browse often. They are so quick and easy to put together, that they are perfect for a busy mom, heck a busy anybody! They take minutes to mix up and 15-20min in the oven and they are done! Great as part of your breakfast or a snack at any time of the day. Can you tell that I love them? The first recipe that had me lovin' these again was Strawberry Chocolate Chip Scones from onceamonthmom.com. Truly a wonderful site where I have never been steered wrong on a recipe. Every one of their recipes turns out great and tastes even better!! I made these when strawberries were in season or when they are on sale. But then I needed a replacement for when I didn't have strawberries. Lo and behold, while searching tastykitchen.com, I found a recipe for Banana Chocolate Chip Scones. At this point, I must share with you that I love {LOVE} anything with chocolate chips. I think it's one of those things that always brings me back to being a little girl and baking with my mom. So when I see a recipe with chocolate chips, I usually have to try it. And these scones were definitely no exception. The scones are a hit with anyone who tries them! So jump right in and give 'em a try!
| Light tasting with a touch of golden crunch! |
Banana Chocolate Chip Scones
by thesimplenest via tastykitchen.com
Ingredients
2 cups flour
2 teaspoons baking powder
3 tablespoons brown sugar
1/2 teaspoon salt
6 tablespoons cold butter
1 teaspoon vanilla
9 tablespoons milk
1/2 cup mini chocolate chips
1 whole banana, not too ripe
Preparation
Preheat your oven to 400F and line 1 or 2 cookies sheets with parchment paper.
In a large bowl, whisk together your flour, baking powder, brown sugar and salt. Cut the butter into small cubes and then use a pastry cutter to blend into the flour mixture. Using a wooden spoon, stir in the vanilla and milk until the dough begins to come together. Now, stir in the chocolate chips. Cut up your banana into small chunks but be sure you don't mash it because it will add too much moisture to the scones. Mix in the chopped banana until just blended. Form the dough into a rectangle on a clean counter or work surface and then cut into triangles. Try not to overwork the dough as it will become a little tough.
Bake for approx 15-20 minutes or until golden brown.
Let cool and eat! Or you can freeze them once they are completely cool and then pop them in the microwave for a quick warm up before eating.
Happy baking!
Subscribe to:
Posts (Atom)