The entire family is home for the holidays, so it is quite busy here as a family of 5. Kids are in and out from playing in the snow and we are just trying to tidy up and get back to normal.
I've been struggling to find new recipes to try. We usually BBQ year round but since we've moved, the BBQ doesn't seem to work. So I'm on the search for baked recipes. With thawed chicken in the fridge, I set out to try a quick and simple recipe. And this recipe did not disappoint. Everyone loved this recipe and it was gobbled up quite quickly.
As I'm trying to start a fresh new me, I will be searching for a lightened up version of this recipe. In the meantime, it won't stop me from making this recipe again!
I made fun rice for a side along with some corn. Vegetable prices out here at the moment are crazy. Looking forward spring so that I can plant a garden. We've lived in a climate that doesn't do well with gardens for the past 5 years, so I'm very excited to plan this.
Ok, on to the recipe!
Parmesan Crusted Chicken breasts
source: www.hellmanns.ca
Ingredients
1/2 cup Hellmann's Real Mayonnaise
1/4 cup grated parmesan
4 boneless, skinless chicken breast halves
4 tsp seasoned dry breadcrumbs
Preheat your oven to 425F. Line a baking sheet with aluminium foil and spray with non stick spray.
Mix mayo and cheese in a bowl. Set aside.
Place chicken breasts in baking sheet. Spoon mayo mix onto chicken breasts and spread. Ensure it is spilt evenly. Sprinkle 1 tsp of breadcrumbs over each chicken breast.
Bake in the oven for 20 mins or until the chicken is cooked.
And that's it!! So simple, tasty, and juicy. My husband asked that I make it again tonight, it was that good. (photo to come)
** I am not associated with Hellmann's nor did I receive any compensation. This is simply my opinion on the recipe. **

Showing posts with label recipe. Show all posts
Showing posts with label recipe. Show all posts
31 December 2015

20 March 2013
Hamburger Steak with Gravy
I love it when food can take me back to my childhood!! And I've always loved when we would have hamburger steaks. It was simple and quick for my Mom and we all loved it.
I wanted to try something with a little more taste and thanks to Pinterest, this wonderful recipe popped up!!
Now the gravy is a little different than the one my Mom used to make, but it's great. My Mom used to make a quick gravy by pouring the leftover tea from the teapot into the pan and deglaze. Voila!!
This one has a little more to it and it tastes great.

Hamburger Steak with Gravy
source: Allrecipes.com
Ingredients
1 lb ground beef
1 egg
1/4 cup breadcrumbs
1/8 tsp ground black pepper
1/2 tsp seasoned salt
1/2 tsp onion powder
1/2 tsp garlic powder
1 tsp Worcestershire sauce
1 tbsp oil (I use canola)
1 cup thinly sliced onions
2 tbsp flour
1 cup beef broth
1 tbsp cooking sherry (in a pinch I used a scant 1/2 tsp of vanilla)
1/2 tsp seasoned salt
Mix together the beef, egg, breadcrumbs, pepper, salt, onion powder, garlic powder and Worcestershire sauce. Make 8 balls and then flatten into patties. I make them pretty thin.
Heat up the oil in a large skillet or fry pan. Place onions and patties and cook until patties are nicely browned, approx 4 mins per side. Remove the patties and keep them warm. **Now I had to cook the patties in 2 batches, so on the second batch, I added the onions.
Sprinkle the flour over the onions and drippings in the pan. Stir it all around so that it soaks up the drippings and at the same time you scrape up some of the cooked bits from the bottom of the pan. Gradually stir in the beef broth and sherry. If it needs it, add some seasoned salt. Simmer over medium-low heat for about 5 mins, stirring until thickened.
Turn heat to low, return patties to pan, cover and simmer for approx 15 mins.
My hubby does not like hamburger steak at all. He has different childhood memories of it (sorry MIL). But, when he tried this, his opinion changed. He loves this!! He craves it and asks for it often. Now my kids still aren't huge fans of gravy, but they love the patties. With ketchup of course.
Happy cooking!
I wanted to try something with a little more taste and thanks to Pinterest, this wonderful recipe popped up!!
Now the gravy is a little different than the one my Mom used to make, but it's great. My Mom used to make a quick gravy by pouring the leftover tea from the teapot into the pan and deglaze. Voila!!
This one has a little more to it and it tastes great.

Hamburger Steak with Gravy
source: Allrecipes.com
Ingredients
1 lb ground beef
1 egg
1/4 cup breadcrumbs
1/8 tsp ground black pepper
1/2 tsp seasoned salt
1/2 tsp onion powder
1/2 tsp garlic powder
1 tsp Worcestershire sauce
1 tbsp oil (I use canola)
1 cup thinly sliced onions
2 tbsp flour
1 cup beef broth
1 tbsp cooking sherry (in a pinch I used a scant 1/2 tsp of vanilla)
1/2 tsp seasoned salt
Mix together the beef, egg, breadcrumbs, pepper, salt, onion powder, garlic powder and Worcestershire sauce. Make 8 balls and then flatten into patties. I make them pretty thin.
Heat up the oil in a large skillet or fry pan. Place onions and patties and cook until patties are nicely browned, approx 4 mins per side. Remove the patties and keep them warm. **Now I had to cook the patties in 2 batches, so on the second batch, I added the onions.
Sprinkle the flour over the onions and drippings in the pan. Stir it all around so that it soaks up the drippings and at the same time you scrape up some of the cooked bits from the bottom of the pan. Gradually stir in the beef broth and sherry. If it needs it, add some seasoned salt. Simmer over medium-low heat for about 5 mins, stirring until thickened.
Turn heat to low, return patties to pan, cover and simmer for approx 15 mins.
My hubby does not like hamburger steak at all. He has different childhood memories of it (sorry MIL). But, when he tried this, his opinion changed. He loves this!! He craves it and asks for it often. Now my kids still aren't huge fans of gravy, but they love the patties. With ketchup of course.
Happy cooking!
3 June 2012
Mini Chocolate Chip Pancake Muffins
I wanted to go out for brunch today but my hubby wanted us to go to a movie so we decided to eat somewhere close to the movie theatre. I opted, at the last minute this morning, to try a quick and easy recipe that I have been looking at for about 2 weeks now. It's quick in that you use a baking mix instead of complete "from scratch". I did find a "from scratch" recipe that I will try very soon, especially after trying these quick ones and loving them.
There are also recipes out there to replace the purchased baking mix, but until I use up my bought mix and try it out, I won't be posting it.
Ok, back to these cute, tasty and light mini pancakes. Love them. They took NO time to put together and baked up in 10 minutes. I will definitely keep these in mind the next time I don't know what to make the kids for lunch. The super fun part is dipping your mini pancake muffins into your bowl of pure maple syrup. We all enjoyed that LOL.

Mini Chocolate Chip Pancake Muffins
source: www.kirbiecravings.com
Ingredients
1 cup of baking mix (I use Bisquick)
1 egg
1/2 cup milk
1/2 cup mini chocolate chips (approx. I just sprinkled some on. A little goes a long way)
Grease a mini muffin tin with non-stick cooking spray. I used 1 pan with 24 mini slots. Preheat your oven to 350F.
In a bowl, combine the baking mix, egg and milk. Don't over mix, it should still have some lumps in it.
Pour the batter into the muffin tin, approx 2/3 full. Drop a few mini chocolate chips on each pancake muffin.
Bake for 10-14 mins or until a tester comes out clean.
Don't judge by the colour as the tops of the pancake muffins will be pale.
The mix made 23 mini pancake muffins for me. I'm sure I could have managed 24.
Next time, I will try a similar recipe totally from scratch. Can't wait!!
Happy baking!
There are also recipes out there to replace the purchased baking mix, but until I use up my bought mix and try it out, I won't be posting it.
Ok, back to these cute, tasty and light mini pancakes. Love them. They took NO time to put together and baked up in 10 minutes. I will definitely keep these in mind the next time I don't know what to make the kids for lunch. The super fun part is dipping your mini pancake muffins into your bowl of pure maple syrup. We all enjoyed that LOL.

Mini Chocolate Chip Pancake Muffins
source: www.kirbiecravings.com
Ingredients
1 cup of baking mix (I use Bisquick)
1 egg
1/2 cup milk
1/2 cup mini chocolate chips (approx. I just sprinkled some on. A little goes a long way)
Grease a mini muffin tin with non-stick cooking spray. I used 1 pan with 24 mini slots. Preheat your oven to 350F.
In a bowl, combine the baking mix, egg and milk. Don't over mix, it should still have some lumps in it.
Pour the batter into the muffin tin, approx 2/3 full. Drop a few mini chocolate chips on each pancake muffin.
Bake for 10-14 mins or until a tester comes out clean.
Don't judge by the colour as the tops of the pancake muffins will be pale.
The mix made 23 mini pancake muffins for me. I'm sure I could have managed 24.
Next time, I will try a similar recipe totally from scratch. Can't wait!!
Happy baking!
1 June 2012
Hot Wing Sauce
This recipe is from my brother who LOVES anything spicy. And any kind of spicy food. This hot wing sauce recipe has been floating around my family for a little over 20 years. I'm not sure where it came from or how my brother got it (did he make it up?) but I know that it's good. I've made it for quite a few Grey Cup parties and Super Bowl parties as well as every day get-togethers. My hubby even insists that I make it as a meal for him!! We BBQ chicken drumsticks and then slather on the sauce at the very end. There's always a ton of sauce leftover and he dunks the chicken in it before taking a bite. Way too spicy for me to do that, but I enjoy it off the BBQ or out of the oven.
Hot Sauce
source: my brother G.
Ingredients
1 1/4 cups Red Hot hot sauce
2 1/2 tsp melted butter
2 1/2 tbsp vinegar
1 tsp garlic powder
2 1/2 tbsp ketchup
cayenne pepper to taste (a little does go a long way)
5 lbs chicken wings/drumettes or chicken pieces
Bake wings in greased pan @350F for about 30-35min then broil them until they are brown and flip them. This takes about 15 mins. Or you can cook them on the BBQ (less mess lol). Now you are ready to add the sauce! For the oven method, I actually heat them in batches in a fry pan on the stove. I just add some sauce until they are coated and the sauce is heated. Transfer back to the pan (after removing the leftover grease) and then once they are all coated, I add a little more sauce and pop them back in a 350 oven for just a little bit. Not too long because the meat will fall off the bones before you can eat them. So maybe 10 min. I put them back in so that the sauce will "bake" onto the wings. If you are BBQing, just slather on the sauce towards the end of the cooking so that the sauce doesn't burn.
You will likely have leftover sauce which can be used for dipping. If you are BBQing, take about half the sauce outside with you to BBQ and keep the other half for dipping :)
note: We made these recently but I didn't manage to get a picture. I should have taken a picture of my hubby enjoying these but I don't think he would have been happy LOL. I will update with a picture soon as I know we will be eating these again!
Happy cooking!
Hot Sauce
source: my brother G.
Ingredients
1 1/4 cups Red Hot hot sauce
2 1/2 tsp melted butter
2 1/2 tbsp vinegar
1 tsp garlic powder
2 1/2 tbsp ketchup
cayenne pepper to taste (a little does go a long way)
5 lbs chicken wings/drumettes or chicken pieces
Bake wings in greased pan @350F for about 30-35min then broil them until they are brown and flip them. This takes about 15 mins. Or you can cook them on the BBQ (less mess lol). Now you are ready to add the sauce! For the oven method, I actually heat them in batches in a fry pan on the stove. I just add some sauce until they are coated and the sauce is heated. Transfer back to the pan (after removing the leftover grease) and then once they are all coated, I add a little more sauce and pop them back in a 350 oven for just a little bit. Not too long because the meat will fall off the bones before you can eat them. So maybe 10 min. I put them back in so that the sauce will "bake" onto the wings. If you are BBQing, just slather on the sauce towards the end of the cooking so that the sauce doesn't burn.
You will likely have leftover sauce which can be used for dipping. If you are BBQing, take about half the sauce outside with you to BBQ and keep the other half for dipping :)
note: We made these recently but I didn't manage to get a picture. I should have taken a picture of my hubby enjoying these but I don't think he would have been happy LOL. I will update with a picture soon as I know we will be eating these again!
Happy cooking!
26 May 2012
Chocolate Chip Banana Bars
I came across this recipe while I was browsing Pinterest and it looked fantastic. I had some over-ripe bananas screaming to be baked, so this was perfect. I wanted something a little different to banana bread but still something soft and cake like (but not as thick as cake).

I had this recipe in the oven within 30 mins and it was baked and sitting on a cooling rack another 20 mins later. And it is incredible. Moist, soft and great banana taste. I think next time I will use mini chips like they suggest. I think my chocolate over powered just a little bit. I really love this recipe. You should definitely give it a try.

Chocolate Chip Banana Bars
source: verybestbaking.com
Ingredients
2 cups all purpose flour
2 tsp baking powder
1/2 tsp salt
3/4 cup butter, softened
2/3 cup sugar
2/3 cup packed brown sugar
1 tsp vanilla
1 cup mashed ripe bananas (approx 2)
1 egg
2 cups mini chocolate chips (I used regular chips)
Preheat your oven to 350F and grease a 15 x 10 inch jelly roll pan with non-stick spray.
Combine flour, baking powder and salt in a medium bowl.
In a large mixer bowl, beat butter, sugars and vanilla until creamy. Beat in the bananas and egg.
Gradually beat in the flour mixture. Stir in the chocolate chips. Spread into jelly roll pan.
Bake for 20-30 mins. or until a cake tester comes out clean. Cool completely in pan on a rack before cutting into bars (or squares).
These were so moist and full of banana taste. Just perfect and yummy!
Enjoy!
Happy Baking!
2 cups all purpose flour
2 tsp baking powder
1/2 tsp salt
3/4 cup butter, softened
2/3 cup sugar
2/3 cup packed brown sugar
1 tsp vanilla
1 cup mashed ripe bananas (approx 2)
1 egg
2 cups mini chocolate chips (I used regular chips)
Preheat your oven to 350F and grease a 15 x 10 inch jelly roll pan with non-stick spray.
Combine flour, baking powder and salt in a medium bowl.
In a large mixer bowl, beat butter, sugars and vanilla until creamy. Beat in the bananas and egg.
Gradually beat in the flour mixture. Stir in the chocolate chips. Spread into jelly roll pan.
Bake for 20-30 mins. or until a cake tester comes out clean. Cool completely in pan on a rack before cutting into bars (or squares).
These were so moist and full of banana taste. Just perfect and yummy!
Enjoy!
Happy Baking!
20 May 2012
Ragout de Boulettes or Meatball Stew
This is traditionally served during the holiday season back home, from what I've been told but I, on the other hand, serve it whenever. The kids love it and it is a great comfort food. Tender meatballs in a gravy served with potatoes and veggies. Very simple and very comforting. I have always made this on my stove top but I think the next time, I am going to give my slow cooker a shot at it as per the linked recipe. It's also very freezer friendly, a big bonus in this house!

Ragout de Boulettes
source: Recettes du Québec
Ingredients
3lbs ground pork
1 1/2lbs ground beef
3/4 cup breadcrumbs
3/4 cup milk
2 eggs
2 tbsp onion powder
1 tsp garlic powder
1 tbsp allspice
1-2 tbsp salt (we aren't salt fans, so I used less than 1 tbsp)
3 cups water
1 small can chicken stock (aylmer or campbells) *see note
1 package of St-Hubert's Ragout sauce
grilled flour (for slow cooker method)
In a large bowl, add the breadcrumbs and milk and let sit 10 mins. Next, add the pork, beef, eggs, spices and salt to the breadcrumb/milk combo. Roll the meatballs to about 1-1.5" each. Place the meatballs in pan on the stove top. Cook the meatballs and do not over crowd them. Cook them in batches as needed.
In a large pot, mix the ragout sauce, water and chicken stock. Heat and bring to a boil, stirring constantly. Once it comes to a boil, reduce heat to low-medium and add the meatballs. Let them simmer, stirring carefully occasionally, for about 30-40 mins. Serve with potatoes and some veggies.
If doing them in a slow cooker, roll in some grilled flour once you have rolled the meatballs and place in the slow cooker. Stir together the water, stock and ragout sauce and then add to the slow cooker. Cook on low for approx 10-12 hours.
This recipe makes a lot of meatballs! Very good for family gatherings. Or you can cook them and then freeze them.
*note: I made my stock by using a powder and using half the amount of water so that it would be concentrated like the cans. It worked for me :)

Ragout de Boulettes
source: Recettes du Québec
Ingredients
3lbs ground pork
1 1/2lbs ground beef
3/4 cup breadcrumbs
3/4 cup milk
2 eggs
2 tbsp onion powder
1 tsp garlic powder
1 tbsp allspice
1-2 tbsp salt (we aren't salt fans, so I used less than 1 tbsp)
3 cups water
1 small can chicken stock (aylmer or campbells) *see note
1 package of St-Hubert's Ragout sauce
grilled flour (for slow cooker method)
In a large bowl, add the breadcrumbs and milk and let sit 10 mins. Next, add the pork, beef, eggs, spices and salt to the breadcrumb/milk combo. Roll the meatballs to about 1-1.5" each. Place the meatballs in pan on the stove top. Cook the meatballs and do not over crowd them. Cook them in batches as needed.
In a large pot, mix the ragout sauce, water and chicken stock. Heat and bring to a boil, stirring constantly. Once it comes to a boil, reduce heat to low-medium and add the meatballs. Let them simmer, stirring carefully occasionally, for about 30-40 mins. Serve with potatoes and some veggies.
If doing them in a slow cooker, roll in some grilled flour once you have rolled the meatballs and place in the slow cooker. Stir together the water, stock and ragout sauce and then add to the slow cooker. Cook on low for approx 10-12 hours.
This recipe makes a lot of meatballs! Very good for family gatherings. Or you can cook them and then freeze them.
*note: I made my stock by using a powder and using half the amount of water so that it would be concentrated like the cans. It worked for me :)
10 May 2012
Strawberry Chocolate Chip Scones
I think that this recipe is one of the first (if not the first) recipe that I tried from the www.onceamonthmom.com site. Their site offers so many different menus and recipes, such a great resource. This recipe was fantastic. It is fantastic! I used it quite often during strawberry season last year. Since strawberry season is creeping up soon, I thought I would pass it along. Scones are so quick to prepare and bake. And of course these are freezer friendly. Can you tell that I'm slightly addicted to scones? I love them. It's a good thing that I put them in the freezer, otherwise, they wouldn't last longer than a day. Be sure to make a batch at the start of strawberry season so that you can take full advantage of the full season! This picture was taken with my phone, so it is not the best quality. As soon as I make a new batch and take a picture, I will update it!

Strawberry Chocolate Chip Scones
source: www.onceamonthmom.com
Ingredients
1 1/2 cups all purpose flour
2 tbsp sugar
2 1/4 tsp baking powder
1/4 tsp baking soda
1/2 tsp salt
6 tbsp butter
1 large egg yolk
1/2 cup buttermilk
1/2 cup strawberries
1/2 cup chocolate chips
1/2 cup almonds chopped (optional - I don't use)
Begin by preheating your oven to 425F. Line a baking sheet with parchment paper.
In a large bowl, sift together the dry ingredients. Next, cut in your butter using a pastry blender until it resembles a coarse meal. You could also use to knives to cut the butter in.
Whisk the egg yolk and buttermilk in a smaller bowl. Now add the wet ingredients to the dry and stir until the dough begins to come together.
Fold in the chocolate chips and strawberries (gently) and place onto a floured surface.
Shape and pat dough into a large square (I always end up with a rectangle for some reason LOL) and cut into to squares again. Then cut into triangles.
Put them on your lined baking sheet and then into the oven. Bake for about 12-15 minutes.
Let them cool before eating or transferring to a freezer bag.
To reheat, I prefer to pop them in a low heat oven. You can also pop them in the microwave.
Makes 8 servings
Happy baking!

Strawberry Chocolate Chip Scones
source: www.onceamonthmom.com
Ingredients
1 1/2 cups all purpose flour
2 tbsp sugar
2 1/4 tsp baking powder
1/4 tsp baking soda
1/2 tsp salt
6 tbsp butter
1 large egg yolk
1/2 cup buttermilk
1/2 cup strawberries
1/2 cup chocolate chips
1/2 cup almonds chopped (optional - I don't use)
Begin by preheating your oven to 425F. Line a baking sheet with parchment paper.
In a large bowl, sift together the dry ingredients. Next, cut in your butter using a pastry blender until it resembles a coarse meal. You could also use to knives to cut the butter in.
Whisk the egg yolk and buttermilk in a smaller bowl. Now add the wet ingredients to the dry and stir until the dough begins to come together.
Fold in the chocolate chips and strawberries (gently) and place onto a floured surface.
Shape and pat dough into a large square (I always end up with a rectangle for some reason LOL) and cut into to squares again. Then cut into triangles.
Put them on your lined baking sheet and then into the oven. Bake for about 12-15 minutes.
Let them cool before eating or transferring to a freezer bag.
To reheat, I prefer to pop them in a low heat oven. You can also pop them in the microwave.
Makes 8 servings
Happy baking!
27 April 2012
Broccoli Salad
I am not always a fan of broccoli salad, sometimes it's way too sweet and I just don't enjoy it when savory foods are too sweet. So I make my version a little less sweet, but still very tasty!!
I picked up this tried and true recipe from my hubby's Tante Helene. She has a ton of family recipes and loves to cook, so she's a great resource for recipes. With summer just around the corner, I will be making this soon, so I will have a picture to add as soon as I do!
Edited April 30/2012: Picture has now been added!

Broccoli Salad
source: Tante Helene
Ingredients
2 to 3 broccoli, cut into bite size pieces
1 cup orange cheddar cheese, shredded
1/2 lb bacon, cut into small pieces
1 cup mayonnaise
1/4 cup sugar (I start with a little more than half this amount and add more if it needs it)
1 to 2 tbsp fresh lemon juice
Optional: unsalted sunflower seeds, minced red onion, craisins or raisins
Place the broccoli in a large bowl.
Mix the mayonnaise, sugar and lemon juice together in a small bowl. Taste and add more sugar if you like.
Add the mayonnaise mixture to the broccoli and stir to incorporate. Add in the bacon and mix. Now add in the cheese and gently mix. If you were adding in any of the optional items, then I would add it at the same time as the bacon.
Happy cooking!!
I picked up this tried and true recipe from my hubby's Tante Helene. She has a ton of family recipes and loves to cook, so she's a great resource for recipes. With summer just around the corner, I will be making this soon, so I will have a picture to add as soon as I do!
Edited April 30/2012: Picture has now been added!

Broccoli Salad
source: Tante Helene
Ingredients
2 to 3 broccoli, cut into bite size pieces
1 cup orange cheddar cheese, shredded
1/2 lb bacon, cut into small pieces
1 cup mayonnaise
1/4 cup sugar (I start with a little more than half this amount and add more if it needs it)
1 to 2 tbsp fresh lemon juice
Optional: unsalted sunflower seeds, minced red onion, craisins or raisins
Place the broccoli in a large bowl.
Mix the mayonnaise, sugar and lemon juice together in a small bowl. Taste and add more sugar if you like.
Add the mayonnaise mixture to the broccoli and stir to incorporate. Add in the bacon and mix. Now add in the cheese and gently mix. If you were adding in any of the optional items, then I would add it at the same time as the bacon.
Happy cooking!!
21 April 2012
Tzatziki recipe
While at cooking school, recipes were always circulating and being shared. A woman from another class had brought in her family recipe for homemade tzatziki and it actually sat in my book for a very long time. I decided about 4 years after finishing cooking school to give it a try. Oh. Em. Gee. This is incredible! It is fresh and wonderful. The strength of the garlic flavor ultimately rests on the garlic you choose, but even with varying strengths, it always tastes incredible. There is a little work to this, but definitely worth it. I will probably have to try this recipe again with the new Greek yogurts that are now available to see if steps can be cut out. Be sure to start your tzatziki the day before you need to it to ensure it's ready.
Tzatziki
source: M.M. via Sandra @ Little Bit Little Bite
Ingredients
3 cups plain Balkan yogurt, drained to yield 300g
200g sour cream
2 tsp lemon juice, freshly squeezed
1 tbsp garlic, finely chopped
90g English cucumber, grated, drained
1 tsp salt
1 tsp canola oil or vegetable oil - do not use olive oil
Pour the yogurt into a clean cloth, tie into a ball and hang in the refrigerator over a bowl to catch the drippings. Let set overnight.
The next day, open the cloth and put the thick yogurt in a bowl.
Put a grater onto the same cloth and grate the cucumber over it (use fine section of the grater). Squeeze over a bowl to extract any water. Discard the water and add dry grated cucumber to the yogurt. Add the remaining ingredients. Mix well and refrigerate.
Happy cooking!
Tzatziki
source: M.M. via Sandra @ Little Bit Little Bite
Ingredients
3 cups plain Balkan yogurt, drained to yield 300g
200g sour cream
2 tsp lemon juice, freshly squeezed
1 tbsp garlic, finely chopped
90g English cucumber, grated, drained
1 tsp salt
1 tsp canola oil or vegetable oil - do not use olive oil
Pour the yogurt into a clean cloth, tie into a ball and hang in the refrigerator over a bowl to catch the drippings. Let set overnight.
The next day, open the cloth and put the thick yogurt in a bowl.
Put a grater onto the same cloth and grate the cucumber over it (use fine section of the grater). Squeeze over a bowl to extract any water. Discard the water and add dry grated cucumber to the yogurt. Add the remaining ingredients. Mix well and refrigerate.
Happy cooking!
18 April 2012
Broiled Salmon
I love salmon. I haven't always, but when I lived next
to the ocean on the West Coast for about 4 years, I fell in love with it. And it
hasn't stopped. My favorite way to cook salmon used to be on the grill. But now,
broiling it in the oven is my new fave. It's so quick and oh so simple, it's the
perfect cooking method when you're time strapped. So this really isn't a recipe,
but it still gives you a wonderfully quick meal, so I had to share. I will sift
through my cookbooks to find a nice sauce to go with this. I used to make a
vodka dill sauce for salmon, but I want to find something that is much simpler.
I know that it will be dill based, because it is a perfect match; dill &
salmon, salmon & dill. Yup, love it! And of course, I just love dill. I
would actually set it out on my table in a vase like a bouquet of flowers. Fresh
dill smells amazing!
 |
| Not a great picture but you can see how there is nice crispiness to the salmon. |
Broiled Salmon
Ingredients
salmon portions, debonned and skin
removed
salt
fresh ground pepper
cooking spray
Set your oven to broil. Spray a baking sheet with cooking spray and set aside. Prepare your salmon by sprinkling each side with salt
and pepper. Place the side of the salmon that had the skin onto the baking
sheet. This will ensure that your will get a little bit of a crispiness. Cook
for about 4 mins. Flip the salmon over and put it back in the oven for another
4 mins. Flip them back over again and if you feel that you would like a little
more crispness, put it back in for about a minute or 2 max. You definitely don't
want to over cook your salmon, so keep a very close eye on it. Serve with rice and veggies.
Happy cooking!
15 April 2012
Slow Cooker Pork Roast
Today was a busy day for me. I bake like a crazy lady on Fridays and Saturdays, package everything up Saturday night and then run to the market on Sunday morning for 8am, all with a 2 and 3 year old in tow. So when I come back on Sunday, I really don't feel like cooking a big meal but definitely want to eat one. So the easiest thing for me, is to break out my slow cooker. Now I love the idea of a slow cooker but for some reason, always chose the worst recipes to try and ended up putting my slow cooker away for quite a few years. Then I decided to try again. My slow cooker and I are now pretty good friends. Especially now that I have found a few good websites for recipes that I trust. But today, I decided to venture off and kinda do one on my own. I found a few recipes here and there, and decided to put my own together. And really, it's so simple that I didn't even really put anything together. It's quick and easy and really budget friendly. My boneless pork loin roast cost $5.65. And the rest is very inexpensive. I probably should have used a larger roast but I went with what I had on hand. I served it with some corn and baked potatoes. I think mashed would have been very good but my kids prefer baked. My mother-in-law loved this and so did I. My daughter loved the sauce so much that she was dipping her corn in it! Another winner here for us!

Quick and Easy Slow Cooker Pork Roast
source: Sandra @ Little Bit Little Bite
Ingredients
1 - 3 or 4 pound boneless pork loin roast, trimmed of fat
1 pouch of onion soup mix
2 cups water
few dashes of Worcestershire sauce
salt & pepper
for the gravy: cornstarch and water
I used a 6 qt. slow cooker for this roast.
Place the roast in the slow cooker. Add a few dashes of Worcestershire sauce to the roast and some salt and pepper. Measure 2 cups of water and add the pouch of onion soup mix. Stir and pour over the pork roast. Put the lid and turn the slow cooker on. Cook on low for 6-8 hours or high for 4-6.
Once done, remove the pork roast to a plate and tent with foil. Pour the remaining liquid into a small saucepan and put heat on high. Mix 1 tbsp cornstarch with 1 tbsp cold water. Once the sauce has heated up, add the cornstarch mixture (or slurry in cooking) and stir. Your sauce will thicken. If it's still not thick enough for you, simply repeat the step above and create another slurry and add it to your sauce. It took 2 slurry mixtures to get my sauce to the right consistency.
You can either cut your meat and serve with the sauce or you can roughly shred your meat, put it back into the now empty slow cooker and then add your sauce. Mix a little and serve.
Happy Cooking!

Quick and Easy Slow Cooker Pork Roast
source: Sandra @ Little Bit Little Bite
Ingredients
1 - 3 or 4 pound boneless pork loin roast, trimmed of fat
1 pouch of onion soup mix
2 cups water
few dashes of Worcestershire sauce
salt & pepper
for the gravy: cornstarch and water
I used a 6 qt. slow cooker for this roast.
Place the roast in the slow cooker. Add a few dashes of Worcestershire sauce to the roast and some salt and pepper. Measure 2 cups of water and add the pouch of onion soup mix. Stir and pour over the pork roast. Put the lid and turn the slow cooker on. Cook on low for 6-8 hours or high for 4-6.
Once done, remove the pork roast to a plate and tent with foil. Pour the remaining liquid into a small saucepan and put heat on high. Mix 1 tbsp cornstarch with 1 tbsp cold water. Once the sauce has heated up, add the cornstarch mixture (or slurry in cooking) and stir. Your sauce will thicken. If it's still not thick enough for you, simply repeat the step above and create another slurry and add it to your sauce. It took 2 slurry mixtures to get my sauce to the right consistency.
You can either cut your meat and serve with the sauce or you can roughly shred your meat, put it back into the now empty slow cooker and then add your sauce. Mix a little and serve.
Happy Cooking!
12 April 2012
Easy Homemade Pizza
I am a big fan of quick and easy recipes. I definitely enjoy the more elaborate recipes but now that I have kids, time is of the essence. I save the elaborate meals for very very very special days (hardly ever). Until the kids are older and more independent, I want to spend as much time with them as I can. When I find a quick and easy recipe, I usually make sure that I love it. And this recipe is quick, easy and tastes great. And the kids love it. What more could I ask for.
There is no kneading in this recipe. Just add ingredients, mix with a wooden spoon, let rest to rise and use. Yup, it's that simple. Freezes like a charm too!


Homemade Pizza
source: www.onceamonthmom.com (here)
Ingredients
2 3/4 cups of lukewarm water
1 1/2 tbsp granulated active yeast (not instant)
1 1/2 tbsp kosher salt
1 tbsp sugar
1/4 cup olive oil
6 1/2 cups unbleached all-purpose flour (I use regular all-purpose)
Mix the yeast, salt, sugar and olive oil with the water in a large bowl. Add the flour and mix using a wooden spoon. No kneading.
Cover and let rest at room temperature for about 2 hours. When you cover, be sure that it is NOT airtight.
Use the dough immediately or if you rather freeze it, place it in the fridge for at least 4 hours and then portion, wrap in plastic and freeze in freezer bags.
To cook your pizza, preheat oven to 450F. Cook for about 15 mins.
This dough makes about 2 large, 3 medium, 4 small or 16 calzones.
You can also make garlic knots with it! Recipe to come for that soon!!
Happy cooking!
There is no kneading in this recipe. Just add ingredients, mix with a wooden spoon, let rest to rise and use. Yup, it's that simple. Freezes like a charm too!


Homemade Pizza
source: www.onceamonthmom.com (here)
Ingredients
2 3/4 cups of lukewarm water
1 1/2 tbsp granulated active yeast (not instant)
1 1/2 tbsp kosher salt
1 tbsp sugar
1/4 cup olive oil
6 1/2 cups unbleached all-purpose flour (I use regular all-purpose)
Mix the yeast, salt, sugar and olive oil with the water in a large bowl. Add the flour and mix using a wooden spoon. No kneading.
Cover and let rest at room temperature for about 2 hours. When you cover, be sure that it is NOT airtight.
Use the dough immediately or if you rather freeze it, place it in the fridge for at least 4 hours and then portion, wrap in plastic and freeze in freezer bags.
To cook your pizza, preheat oven to 450F. Cook for about 15 mins.
This dough makes about 2 large, 3 medium, 4 small or 16 calzones.
You can also make garlic knots with it! Recipe to come for that soon!!
Happy cooking!
7 April 2012
Ground Beef Stroganoff
I found this recipe through www.onceamonthmom.com when I was looking for some easy to freeze and keep on hand meals. I wasn't sure how my hubby was going to like it, but when I finally made it, he said that it was out of this world. But I hadn't made it since. No real reason, I think I just forgot about it. Silly me. I was stuck the other day and not sure what to make. I knew that I had lean ground beef ready to use and then I remembered that I had mushrooms. Ding! (insert light above head here). I threw this meal together in no time flat. And it was a huge hit with the kids again and now my mother-in-law!!

Ground Beef Stroganoff
source: found initially http://onceamonthmom.com (here) but recipe
is from http://stolenmomentscooking.com (here)
Ingredients
1 lb lean ground beef
1 large onion, diced (I tend to do more of a mince)
1/2 lb fresh mushrooms, diced
3 cloves garlic, minced
salt and pepper to taste
1 tsp Italian seasoning
3 tbsp flour
1 1/2 cups beef stock (I used a light version)
2 tsp red wine vinegar
1 cup sour cream (I used light)
1/2 lb egg noodles, cooked and drained (we used whole wheat, no yolk)
In a large skillet, add ground beef, onion, mushroom and garlic. Cook until the ground beef is completely browned. Add salt and pepper along with the Italian seasoning. Do not drain the liquid from the pan. You need it.
Stir in the flour and cook for about 2-3 minutes. Slowly pour in beef stock and red wine vinegar. Stir then bring to a boil and simmer until thickened.
Stir in the sour cream until combined. Add your cooked noodles and mix well. Remove from the heat.
To make freezer friendly - Once the sour cream has been stirred in, allow to cool completely. Place in freezer bags or containers and freeze them. When you are ready to eat, thaw the mixture and then reheat on the stove. Add in your egg noodles and mix.
Happy cooking!

Ground Beef Stroganoff
source: found initially http://onceamonthmom.com (here) but recipe
is from http://stolenmomentscooking.com (here)
Ingredients
1 lb lean ground beef
1 large onion, diced (I tend to do more of a mince)
1/2 lb fresh mushrooms, diced
3 cloves garlic, minced
salt and pepper to taste
1 tsp Italian seasoning
3 tbsp flour
1 1/2 cups beef stock (I used a light version)
2 tsp red wine vinegar
1 cup sour cream (I used light)
1/2 lb egg noodles, cooked and drained (we used whole wheat, no yolk)
In a large skillet, add ground beef, onion, mushroom and garlic. Cook until the ground beef is completely browned. Add salt and pepper along with the Italian seasoning. Do not drain the liquid from the pan. You need it.
Stir in the flour and cook for about 2-3 minutes. Slowly pour in beef stock and red wine vinegar. Stir then bring to a boil and simmer until thickened.
Stir in the sour cream until combined. Add your cooked noodles and mix well. Remove from the heat.
To make freezer friendly - Once the sour cream has been stirred in, allow to cool completely. Place in freezer bags or containers and freeze them. When you are ready to eat, thaw the mixture and then reheat on the stove. Add in your egg noodles and mix.
Happy cooking!
5 April 2012
Homefries on the side
We enjoy to mix things up sometimes. We normally like our homefries to go with our big breakfast but since it's rare that we eat a big breakfast, we decided to add homefires to our BBQ meals. And it worked out great! Since it is no longer for breakfast, I'm able to spice up our fries a little bit more. These are great with burgers, steak, chicken or any time really.
Spiced Homefries
source: Sandra @ Little Bit Little Bite
Ingredients
white or red potatoes
canola oil
chili powder
paprika
onion powder
garlic powder
dried parsley
little cumin
touch of cayenne
sprinkle of crushed chilis
salt
freshly ground pepper
Heat oven to 400F.
Mix spices together in a bowl with some oil. You do not want the mixture to be like a paste. You want it to be a little more liquid.
Wash, peel (optional) and dice your potatoes. The quantity of potatoes will depend on you and how many you will be serving. I tend to do a lot because I like to have leftovers. Please you potatoes in a bowl.
Pour the spice mixture over your potatoes and toss. Place on a baking sheet and put in the oven.
Bake for 45-60mins, turning halfway through.
I've tried these on the BBQ as well and they work great. To speed things up on the BBQ, I cook them in the microwave for a bit before adding the spice mixture. When I feel that the potatoes are close to done, I add the spice mixture then divide into foil packets. They turn out pretty good!
Happy cooking!
Spiced Homefries
source: Sandra @ Little Bit Little Bite
Ingredients
white or red potatoes
canola oil
chili powder
paprika
onion powder
garlic powder
dried parsley
little cumin
touch of cayenne
sprinkle of crushed chilis
salt
freshly ground pepper
Heat oven to 400F.
Mix spices together in a bowl with some oil. You do not want the mixture to be like a paste. You want it to be a little more liquid.
Wash, peel (optional) and dice your potatoes. The quantity of potatoes will depend on you and how many you will be serving. I tend to do a lot because I like to have leftovers. Please you potatoes in a bowl.
Pour the spice mixture over your potatoes and toss. Place on a baking sheet and put in the oven.
Bake for 45-60mins, turning halfway through.
I've tried these on the BBQ as well and they work great. To speed things up on the BBQ, I cook them in the microwave for a bit before adding the spice mixture. When I feel that the potatoes are close to done, I add the spice mixture then divide into foil packets. They turn out pretty good!
Happy cooking!
2 April 2012
Honey Garlic Chicken for the slow cooker
With my busy baking schedule on Fridays and Saturdays now, it's important for me to have something easy ready for supper because I'm not going to want to really do much. So I found a recipe for the slow cooker for some chicken thighs I had in the freezer. I went to one of my favorite sites for anything slow cooker, http://crockpot365.blogspot.com. The author has a great variety of recipes to choose from and she also puts up a verdict of how her family enjoyed the recipe. Definitely worth browsing!
I made this while baking on Saturday and it was so tasty. It smelled great while cooking and the taste didn't disappoint. There is a sweetness to the chicken but not overpowering at all, just the right amount. And the chicken was nice and tender. I am definitely throwing this recipe into my rotation, too good not too!!

Honey Garlic Chicken for the slow cooker
source: www.crockpot365.blogspot.com
Ingredients
1 1/2 - 2 lbs boneless, skinless chicken thighs
3 garlic cloves, minced
1 tsp dried basil
1/2 cup soy sauce
1/2 cup ketchup
1/3 cup honey
Use a 4qt slow cooker for this recipe. If you are using a 6qt slow cooker, like I did, the chicken is going to cook faster. So with the 6qt, be sure to check after 3 hours on high or 5 hours on low for doneness.
Put your chicken into the slow cooker. Place remaining ingredients into a small bowl and mix. Pour mixture evenly over the chicken and cover.
Cook on low for 6 hours or on high for 3-4 hours if using a 4qt slow cooker.
Serve with rice and your choice of veggies.
Happy cooking!
I made this while baking on Saturday and it was so tasty. It smelled great while cooking and the taste didn't disappoint. There is a sweetness to the chicken but not overpowering at all, just the right amount. And the chicken was nice and tender. I am definitely throwing this recipe into my rotation, too good not too!!

Honey Garlic Chicken for the slow cooker
source: www.crockpot365.blogspot.com
Ingredients
1 1/2 - 2 lbs boneless, skinless chicken thighs
3 garlic cloves, minced
1 tsp dried basil
1/2 cup soy sauce
1/2 cup ketchup
1/3 cup honey
Use a 4qt slow cooker for this recipe. If you are using a 6qt slow cooker, like I did, the chicken is going to cook faster. So with the 6qt, be sure to check after 3 hours on high or 5 hours on low for doneness.
Put your chicken into the slow cooker. Place remaining ingredients into a small bowl and mix. Pour mixture evenly over the chicken and cover.
Cook on low for 6 hours or on high for 3-4 hours if using a 4qt slow cooker.
Serve with rice and your choice of veggies.
Happy cooking!
31 March 2012
Tante Hélène's Vinaigrette and Salad
My husband's aunt (tante in French), Hélène, makes a wonderful salad that is great with anything from the BBQ. It could be used pretty much anytime but I always associate it with spring/summer and BBQ. She shared her recipe with us after one of our visits to their farm so that we could enjoy it at home! And now, I'm sharing it with you. It has a tang which of course you could lessen by reducing the amount of lemon juice you use, but to be honest, it's perfect with a mixed salad.
Tante Hélène's vinaigrette
source: Hélène B.
Tante Hélène's vinaigrette
source: Hélène B.
Ingredients
1-2 garlic cloves, minced
1 tbsp dijon mustard
1/3 cup olive oil (I use the light version)
1/3 cup lemon juice, fresh
2-3 tbsp olive juice (from a jar of stuffed manzanilla olives)
freshly ground black pepper and dried parsley to taste
Whisk together and allow to sit while you prepare your salad to ensure the flavors blend. She actually uses an old mason jar or other jar that she has laying around (an old olive jar) and just puts it all in and shakes it, which is easy and convenient.
For the salad, you can make it your own by adding or removing anything you like. It's really how you want it!
romaine lettuce
romaine lettuce
spinach
green onions, chopped or minced depending on your preference
broccoli, bite size
cauliflower, bite size
red cabbage, shredded
red and green peppers, diced
cucumbers, diced
shredded cheese
manzanilla olives, chopped
shredded carrot
insert your favorite item here!
Mix up, serve and enjoy!!
Happy cooking!
red and green peppers, diced
cucumbers, diced
shredded cheese
manzanilla olives, chopped
shredded carrot
insert your favorite item here!
Mix up, serve and enjoy!!
Happy cooking!
28 March 2012
Chicken Pomodoro
I like to try and have some meals ready to go in the freezer for those days where I'm not 100%. I managed to freeze the sauce for this dish in January. And the other day, I wasn't feeling energetic. At all. I worked hard this past weekend baking up some goodies. I baked all day Saturday (and even in to the wee hours of Sunday morning) and then was up early on Sunday. So everything was in slow motion as I tried to catch up on housework. All I had to do was cook the chicken and add the sauce. I had originally planned to serve this sauce with shrimp instead of chicken, but with my DH not home for supper, I made it so that my kids would eat it too. And they did! Loved every bite!!

Chicken Pomodoro
source: onceamonthmom.com(here), but the recipe is from here
Ingredients
2 tbsp olive oil
1/4 onion, diced
5 cloves garlic, minced
1/4 tsp crushed red pepper flakes
salt and pepper, to taste
2 - 15oz cans diced tomatoes
1 1/2 tsp sugar
3 tbsp pesto
1/2 lb chicken breasts, cooked and cubed (optional - you can sub with shrimp, italian sausage or even nothing)
Heat olive oil in a large skillet. Add onion, garlic and pepper flakes. Season with salt and pepper. Cook until onions are nearly translucent, about 3 minutes.
While the onion and garlic cooks, pour the tomatoes (liquid and all) into a food processor, blender or bowl and use a hand blender (like I did). Process until coarsely chopped to desired consistency. (Process less for a heartier sauce or longer for a creamier sauce).
Add tomatoes and sugar to the skillet. Simmer for about 5 minutes, until very fragrant and somewhat thickened.
Stir in the pesto and simmer another 5-10 minutes. Next, stir the chicken into the sauce just until warmed through. Serve over pasta (I used whole wheat).
Happy cooking!
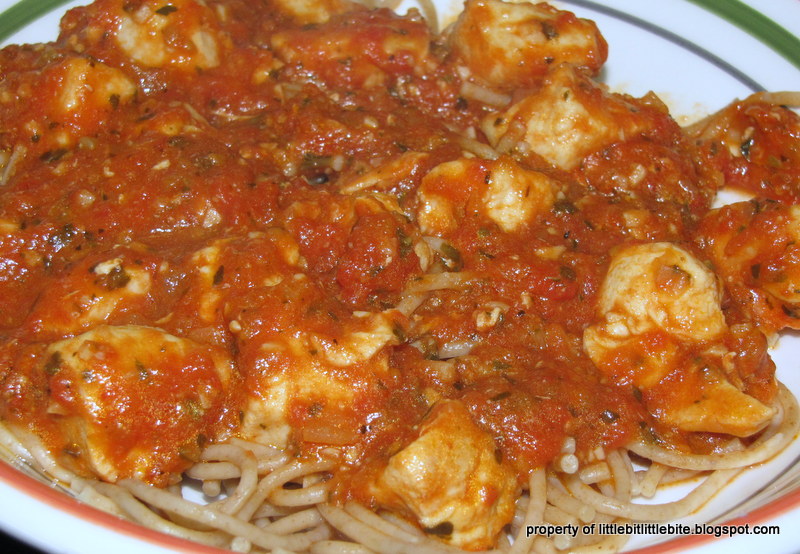
Chicken Pomodoro
source: onceamonthmom.com(here), but the recipe is from here
Ingredients
2 tbsp olive oil
1/4 onion, diced
5 cloves garlic, minced
1/4 tsp crushed red pepper flakes
salt and pepper, to taste
2 - 15oz cans diced tomatoes
1 1/2 tsp sugar
3 tbsp pesto
1/2 lb chicken breasts, cooked and cubed (optional - you can sub with shrimp, italian sausage or even nothing)
Heat olive oil in a large skillet. Add onion, garlic and pepper flakes. Season with salt and pepper. Cook until onions are nearly translucent, about 3 minutes.
While the onion and garlic cooks, pour the tomatoes (liquid and all) into a food processor, blender or bowl and use a hand blender (like I did). Process until coarsely chopped to desired consistency. (Process less for a heartier sauce or longer for a creamier sauce).
Add tomatoes and sugar to the skillet. Simmer for about 5 minutes, until very fragrant and somewhat thickened.
Stir in the pesto and simmer another 5-10 minutes. Next, stir the chicken into the sauce just until warmed through. Serve over pasta (I used whole wheat).
Happy cooking!
24 March 2012
Steak Subs
Growing up on the south shore of Montreal, we were very lucky to have the second Belle Province restaurant in the now very popular chain. It opened in 1976 and I can still remember the small seating area with red stools. My parents weren't hamburger chain fans, but they were fans of greasy patate frites (french fries), steamies (steamed hot dogs), smoked meat sandwiches and subs. In the last few years, being away from the area, I have found similar places, but nothing matches those wonderful subs. Now this recipe is in no way close to those wonderful subs from back home, but is a result of having a roast out and not feeling like doing a big roast beef with all the fixings. So I ended up just slicing the meat thinly into strips with some peppers and mushrooms and adding seasoning. It has now become one of my go to recipes. The flavoring for the meat has changed slightly because the kids don't do spicy so well. But you can definitely mix a sauce that suits your tastes. I hope to be able to match those subs one day, but for now, this does a great job!
Steak Subs
source: Sandra @ littlebitlittlebite
Ingredients
inside or outside round steaks or roast (I usually buy maybe 2 small pkgs of steaks or 1 family size), thinly sliced into strips
1/2 green and 1/2 red pepper, thinly sliced
1/2 pkg of mushrooms, thinly sliced
1/2 an onion, thinly sliced (optional)
1 clove garlic, minced
few dashes of Worcestershire sauce
Montreal steak spice
sweet BBQ sauce (I use Sweet Baby Ray's but really any BBQ sauce works)
Cheddar or mozzarella cheese, shredded
Italian salad dressing or sub dressing
lettuce, shredded
tomatoes, diced
rolls, panini buns, sub buns, sliced almost through the bun
I actually stir fry this mixture, so I start out with cooking the meat at a medium high heat and once it's almost cooked lower it to medium heat and add in the garlic. Cook for about 1-2 mins until fragrant. Next add in the steak spice,Worcestershire sauce and BBQ sauce. Add in your vegetables and continue to cook until they begin to soften being careful not to burn them.
Prepare your buns by adding some shredded cheese. Once the meat is ready, start filling up your buns with the steak mixture. I put a little more cheese on top, some salad dressing and then top as desired with lettuce and tomatoes. Now you could pop it in the oven for a little bit if you like before adding the dressing, lettuce and tomatoes, but that's up to you. For my kids, I simply cut up the meat and veggies to smaller bites and cut the sub into smaller pieces. It always goes over big.
Happy cooking!
Steak Subs
source: Sandra @ littlebitlittlebite
Ingredients
inside or outside round steaks or roast (I usually buy maybe 2 small pkgs of steaks or 1 family size), thinly sliced into strips
1/2 green and 1/2 red pepper, thinly sliced
1/2 pkg of mushrooms, thinly sliced
1/2 an onion, thinly sliced (optional)
1 clove garlic, minced
few dashes of Worcestershire sauce
Montreal steak spice
sweet BBQ sauce (I use Sweet Baby Ray's but really any BBQ sauce works)
Cheddar or mozzarella cheese, shredded
Italian salad dressing or sub dressing
lettuce, shredded
tomatoes, diced
rolls, panini buns, sub buns, sliced almost through the bun
I actually stir fry this mixture, so I start out with cooking the meat at a medium high heat and once it's almost cooked lower it to medium heat and add in the garlic. Cook for about 1-2 mins until fragrant. Next add in the steak spice,Worcestershire sauce and BBQ sauce. Add in your vegetables and continue to cook until they begin to soften being careful not to burn them.
Prepare your buns by adding some shredded cheese. Once the meat is ready, start filling up your buns with the steak mixture. I put a little more cheese on top, some salad dressing and then top as desired with lettuce and tomatoes. Now you could pop it in the oven for a little bit if you like before adding the dressing, lettuce and tomatoes, but that's up to you. For my kids, I simply cut up the meat and veggies to smaller bites and cut the sub into smaller pieces. It always goes over big.
Happy cooking!
21 March 2012
Bruschetta Chicken Bake
I am trying very hard to eliminate any processed foods from my cooking and our diets. But this recipe is so quick and simple that it's hard to give up. I will definitely scour the net for a substitute recipe for the stuffing, as I'm sure there is one out there. This recipe takes no time to put together and takes only 30 min in the oven. It's also very tasty and both my kids devour this. They really do clean their plates on this one!


Bruschetta Chicken Bake
source: www.kraftcanada.com
Ingredients
1 can (540ml/19fl.oz) stewed tomatoes, undrained (I use Aylmer Accents Italian seasonings)
1 package Stove Top stuffing, chicken
2 cloves garlic, minced
1 1/2 lbs boneless skinless chicken breasts, cut into bite size pieces
1 tsp dried basil
1 cup mozzarella cheese, shredded
Heat oven to 400F.
Mix the tomatoes, stuffing and garlic in a bowl until the stuffing is just moistened.
Place chicken in 13x9 baking dish or 3L casserole, then basil and top with cheese.
Next, cover with the stuffing mixture and bake for 30 minutes or until chicken is done.
Serve with some veggies and there is a quick and yummy meal for the family!
Happy cooking!


Bruschetta Chicken Bake
source: www.kraftcanada.com
Ingredients
1 can (540ml/19fl.oz) stewed tomatoes, undrained (I use Aylmer Accents Italian seasonings)
1 package Stove Top stuffing, chicken
2 cloves garlic, minced
1 1/2 lbs boneless skinless chicken breasts, cut into bite size pieces
1 tsp dried basil
1 cup mozzarella cheese, shredded
Heat oven to 400F.
Mix the tomatoes, stuffing and garlic in a bowl until the stuffing is just moistened.
Place chicken in 13x9 baking dish or 3L casserole, then basil and top with cheese.
Next, cover with the stuffing mixture and bake for 30 minutes or until chicken is done.
Serve with some veggies and there is a quick and yummy meal for the family!
Happy cooking!
17 March 2012
Uncle Frankie's Marinara Sauce
I come from an Irish/French Canadian/Welsh/English background. So on one side (Irish/French), I have a very big, loud, bilingual, traditional family. Well, traditional in that we celebrate EVERY occasion with a big party and food. Lots of food. And add to this wonderful mix, my Italian uncle, Frankie. He can cook. Like really cook some amazing Italian fare. And we can eat. So it's a perfect blend. Now this recipe doesn't really have exact measurements, it's an on the fly, what are you feeling like today kinda recipe. And I love it! I make a big batch and then use it for every recipe that calls for a sauce. I use it in the baked chicken paremsan recipe and if I want a sauce with some ground meat in it (beef, turkey, chicken), I just cook up the meat, drain the fat, add some italian seasoning and then add the sauce. It's perfect every time! So without further ado, here's the recipe.
Uncle Frankie's Marinara Sauce
source: my Uncle Frank C.
Ingredients
2 cans of Italian tomatoes (Pastene or Primo), pureed in a blender
1 can of tomato paste
garlic (I tend to use about 6 cloves - use however much or little you like)
finely chopped onion (I use 1 small-medium, whatever I have on hand really)
Basil (fresh or dried)
Oregano (fresh or dried)
1 cup chicken stock*
salt and pepper
chili flakes, if you like a kick
Sauté the onions and garlic either in a little bit of oil or spray the pot with cooking spray before adding them. Add in the pureed tomatoes and herbs. Next add the chicken stock and tomato paste. Stir it as you add to it to ensure it is well mixed. Let it simmer for at least 30-45 minutes on low.
Taste as you go and add missing seasonings, if any. That's it!! Very quick and simple! Oh and definitely tasty!!
Happy cooking!
Uncle Frankie's Marinara Sauce
source: my Uncle Frank C.
Ingredients
2 cans of Italian tomatoes (Pastene or Primo), pureed in a blender
1 can of tomato paste
garlic (I tend to use about 6 cloves - use however much or little you like)
finely chopped onion (I use 1 small-medium, whatever I have on hand really)
Basil (fresh or dried)
Oregano (fresh or dried)
1 cup chicken stock*
salt and pepper
chili flakes, if you like a kick
*For the chicken stock, I tried the Campbell's ready to use stock and I didn't like the taste. So I tried using the powder from Loney and adding the recommended hot water (as per their instructions) and it was dead on!! Much cheaper on the pocket book too!
Sauté the onions and garlic either in a little bit of oil or spray the pot with cooking spray before adding them. Add in the pureed tomatoes and herbs. Next add the chicken stock and tomato paste. Stir it as you add to it to ensure it is well mixed. Let it simmer for at least 30-45 minutes on low.
Taste as you go and add missing seasonings, if any. That's it!! Very quick and simple! Oh and definitely tasty!!
Happy cooking!
Subscribe to:
Posts (Atom)